
There’s a certain kind of magic in recipes that travel through generations—simple, humble dishes that don’t need fancy ingredients or complicated techniques to make your heart sing. Fried cornmeal mush is exactly that. It’s the kind of food that reminds you of slow Sunday mornings, of a grandmother’s kitchen filled with the scent of toasted corn and butter, of meals that cost almost nothing but taste like everything.
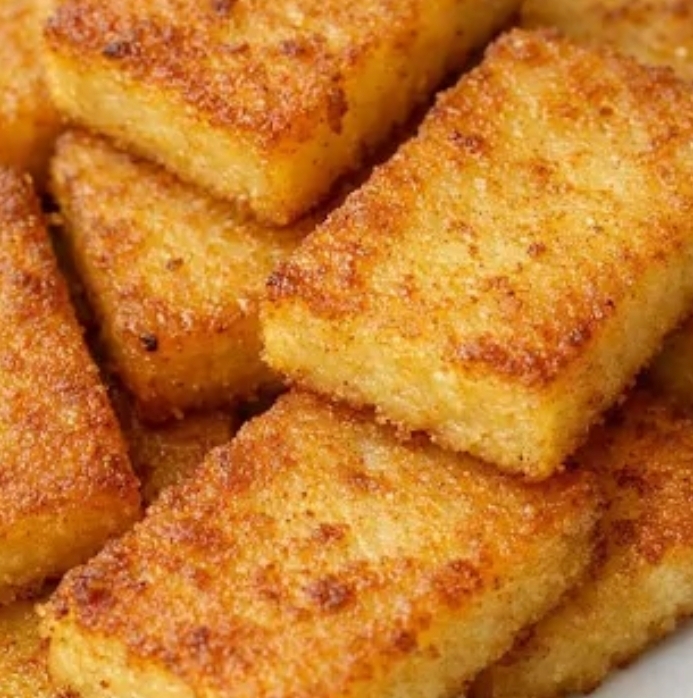
If you’ve never tried it, imagine this: creamy, seasoned cornmeal chilled until firm, then sliced into golden rectangles and pan-fried until the edges shatter with crispness while the inside stays tender and comforting. It’s like polenta’s cozy Midwestern cousin, and once you taste it, you’ll wonder how it ever slipped under your radar.
Best of all? It’s a make-ahead dream. Whip up a batch on the weekend, then fry up slices all week for breakfasts, brunches, or even quick dinners. Whether you like yours drizzled with maple syrup or topped with a runny egg, this recipe bends to your mood—and your pantry.
Let’s bring a little old-school comfort to your table.
What Exactly Is Cornmeal Mush?
Before we get cooking, let’s clear up any confusion. Cornmeal mush is simply cornmeal simmered with water (or milk) and a pinch of salt until it thickens into a porridge-like consistency. Think of it as a savory, unsweetened cousin to oatmeal. Once chilled, it firms up enough to slice—and that’s when the real fun begins.
Frying those slices transforms the soft, creamy interior into something with a crackly, golden exterior. The contrast is everything. And because the base recipe is so neutral, you can take it sweet, savory, or somewhere beautifully in between.
Ingredients You’ll Need
This recipe is beautifully simple. You likely have everything already.
For the Mush
1 cup medium-grind cornmeal (not cornstarch—important!)
Substitute: Polenta or stone-ground cornmeal works great; just note cooking time may vary slightly.
4 cups liquid: Use all water, all milk, or a 50/50 mix for extra richness.
Substitute: Vegetable or chicken broth adds savory depth for a dinner-worthy version.
1 teaspoon salt: Adjust to taste.
1 tablespoon butter or oil (optional, for extra creaminess).
For Frying
2-3 tablespoons neutral oil or butter for the skillet
Optional coatings: A light dusting of cornstarch or flour helps extra-crisp lovers, but it’s not required.
For Serving (Mix & Match!)
Sweet: Maple syrup, honey, fresh berries, cinnamon sugar, or a dollop of yogurt.
Savory: Fried or poached eggs, crispy bacon, sautéed greens, hot sauce, or a spoonful of chili.
Both worlds: A pat of butter + flaky sea salt + a drizzle of honey. Trust me on this combo.
Step-by-Step Instructions
1. Cook the Mush (10 minutes)
In a medium saucepan, bring your 4 cups of liquid and salt to a gentle boil. Slowly whisk in the cornmeal to prevent lumps. Reduce heat to low and cook, stirring frequently with a wooden spoon, for about 8-10 minutes until the mixture thickens and pulls away from the sides of the pot. If using butter or oil, stir it in at the end.
Pro tip: Keep stirring! Cornmeal loves to stick, and constant attention means a silky, lump-free result.
2. Chill Until Firm (The Easy Part)
Pour the cooked mush into a lightly greased 8×4 or 9×5 inch loaf pan. Smooth the top with a spatula. Let it cool at room temperature for 15 minutes, then cover and refrigerate for at least 3 hours—or overnight. This step is non-negotiable: it firms up the mush so it slices cleanly.
Make-ahead hack: Prep this up to 3 days in advance. Just keep it covered in the fridge until you’re ready to fry.
3. Slice with Confidence
Once firm, turn the mush out onto a cutting board. Slice into ½-inch thick rectangles or triangles—whatever shape makes you happy. If it sticks, dip your knife in warm water between cuts.
4. Fry to Golden Perfection
Heat a large skillet (cast iron is ideal) over medium heat. Add enough oil or butter to lightly coat the bottom. Once shimmering, add the slices in a single layer—don’t crowd the pan; work in batches if needed.
Cook for 3-4 minutes per side, until deeply golden and crisp at the edges. Resist the urge to flip too early—let that crust form! Transfer to a paper towel-lined plate if you like, though I usually go straight to my plate.
5. Serve Warm and Happy
Serve immediately while the edges are still crackly. Top with your favorite sweet or savory fixings, and enjoy that beautiful contrast of textures.
Tips for Perfect Slices Every Time
Don’t skip the chill: Warm mush won’t hold its shape. If you’re in a hurry, pop the loaf pan in the freezer for 45 minutes.
Get your pan hot enough: If the oil isn’t shimmering, the slices will absorb grease instead of crisping. But don’t let it smoke—medium heat is your friend.
Press gently: When frying, lightly press the slices with a spatula for even contact with the pan.
Reheat like a pro: Leftovers reheat beautifully in a skillet or toaster oven. Avoid the microwave if you want to keep that crisp edge.
Fun Ways to Mix It Up
Cheesy Herb: Stir ½ cup shredded cheddar and 1 tablespoon fresh herbs into the cooked mush before chilling. Fry and serve savory-style.
Sweet Cinnamon: Add 2 tablespoons brown sugar and 1 teaspoon cinnamon to the cooking liquid for a dessert-worthy version.
Spicy Kick: Mix a diced jalapeño or a pinch of cayenne into the mush before chilling. Top with avocado and a fried egg.
Breakfast Sandwich: Use two crispy slices as “bread” for a sandwich with egg, cheese, and bacon. Genius, right?
Frequently Asked Questions
Can I make this gluten-free?
Yes! Cornmeal is naturally gluten-free. Just double-check that your brand is processed in a gluten-free facility if you have celiac disease or sensitivity.
Why did my mush turn out grainy?
This usually means it wasn’t cooked long enough. Keep stirring over low heat until it’s thick and smooth—about 10 minutes. Using finely ground cornmeal also helps.
Can I bake instead of fry?
Absolutely! Brush slices with oil and bake at 425°F (220°C) for 15-20 minutes, flipping halfway. They’ll be slightly less crispy but still delicious—and hands-off.
How do I store leftovers?
Keep uncooked, chilled mush wrapped in the fridge for up to 3 days. Cooked slices store well in an airtight container for 2 days; re-crisp in a skillet before serving.